
Save money on heating! Learn how to install garage door weather stripping and improve insulation with our DIY instructions, brought to you by the experts from R&S Overhead Doors and Gates of Sacramento, CA!
Sealing the garage door helps keep out cold air, dust, and rain while making the space more comfortable. The weather can shift quickly; adding weather stripping is an easy way to improve comfort and protect what’s inside the garage from moisture and dirt.
This guide explains how to install garage door weather stripping in Sacramento using clear steps anyone can follow. The garage door can be sealed quickly with a few essential tools. It’s a small home upgrade that helps improve energy savings and keeps the space cleaner and more secure.
What Is Garage Door Weather Stripping and Why Is It Important
Garage door weather stripping is the soft rubber or plastic strip around the edges of your garage door. It helps keep out rain, wind, dust, and bugs, keeping your garage clean and dry inside.
When the weather changes frequently, good weather stripping helps a lot. It keeps the garage from getting too hot or too cold, saving energy and making the space more comfortable to use at any time.
It also prevents water and small animals from getting inside and messing up your stuff. If the strip is old or broken, it’s a good idea to change it to keep your garage safe.
How Do I Know If My Garage Door Needs New Weather Stripping
Recognizing the signs of worn-out weather stripping is key to maintaining your garage’s efficiency. Common indicators include:
Visible Damage
Cracks, tears, or gaps in the garage door weather stripping are signs it needs to be replaced. Damaged weather stripping cannot block air, water, or bugs. Replacing it helps keep the garage safe, clean, and protected from the outside.
Drafts or Leaks
Cold air or water from the edges means the garage door weather stripping is no longer sealing properly. A loose or worn-out seal allows outside air and moisture inside, making the garage feel cold and damp.
Increased Energy Bills
When garage door weather stripping wears out, it can lead to higher energy bills. Poor sealing lets warm or cool air escape, making the heating or cooling system work harder. A new seal can help save money and energy.
Light Coming In

Daylight showing around the edges of a closed garage door is a clear sign of worn garage door weather stripping. If light can get in, so can air, dust, and bugs. A new seal keeps the space more secure and comfortable.
Can I Install Garage Door Weather Stripping Myself
Putting on garage door weather stripping is an easy project if you’re used to doing small fixes around the house. You don’t need many tools; it only takes a few hours. It helps keep out cold air, bugs, and dust.
But it’s important to put it on straight so it works right. If you’re not sure you can do it well, it’s a good idea to call a professional garage door installer in Sacramento. They can make sure the weather stripping fits right and keeps your garage safe and sealed.
What Tools and Materials Do I Need for Installation
To install garage door weather stripping, you’ll need the following tools and materials:
1. Weather Stripping Kit
You can buy a garage door weather stripping kit at most hardware stores. Make sure it fits your door type. The kit usually has the seal, track, and parts to install the weather stripping and keep air and water out.
2. Measuring Tape

A measuring tape helps you check the size of your garage door. You need to measure the width, height, and thickness. This helps you choose garage door weather stripping that fits right and gives a tight seal around the whole door.
3. Utility Knife or Scissors
You’ll need a sharp knife or strong scissors to cut the garage door weather stripping. Cut it to match your door size. Make sure your cuts are straight so the weather stripping fits well and keeps the air and rain out.
4. Hammer and Nails or Screws and Drill
To put on the garage door weather stripping, you might need a hammer with nails or a drill with screws. Use what the kit tells you. These tools help attach the seal to your door so it stays in place.
5. Safety Gear
Wear gloves and safety glasses when working with garage door weather stripping. Gloves protect your hands while cutting or using tools. Glasses keep your eyes safe from dust or small pieces. It’s always smart to stay safe while doing the job.
How Do I Measure My Garage Door for Weather Stripping
Accurate measurements are vital for effective weather stripping installation. Follow these steps:
Width Measurement
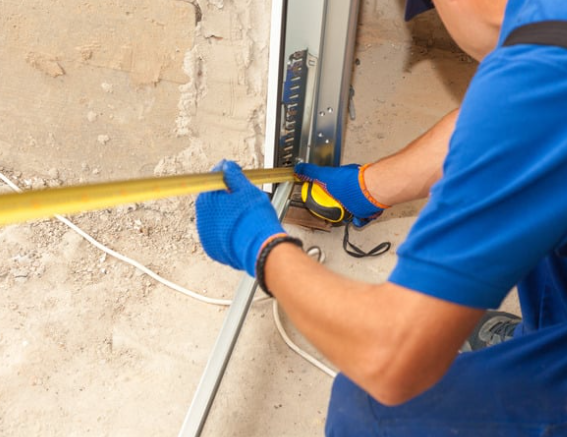
To get the right size garage door weather stripping, start by measuring the width of your garage door opening. Use a tape measure and go from one side to the other. This helps make sure the seal will cover the full opening.
Height Measurement
Next, measure the height of the garage door from the floor to the top of the opening. This measurement helps you choose garage door weather stripping that fits properly and seals all the way from the bottom to the top edge.
Depth Measurement
Measure the thickness of your garage door to find the right fit for garage door weather stripping. This step is important because the seal needs to match the door’s depth. If it’s too thin or too thick, it won’t work well.
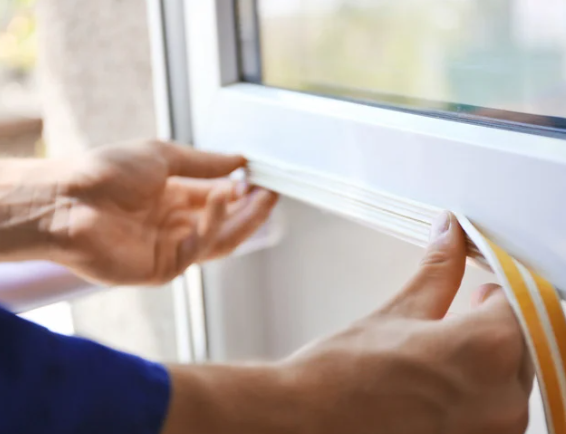
Steps to Install Garage Door Weather Stripping
Installing weather stripping involves several key steps:
- Remove Old Weather Stripping: Carefully detach any existing weather stripping, ensuring the surface is clean and free from debris.
- Cut New Weather Stripping: Using your measurements, cut the new weather stripping to size.
- Attach Top Piece: Start with the top of the garage door. Position the weather stripping so that it forms a seal when the door is closed. Secure it in place with nails or screws, spacing them about 6 to 12 inches apart.
- Install Side Pieces: Repeat the process for both sides of the door, ensuring the stripping overlaps the top piece to create a continuous seal.
- Install Bottom Seal: If your garage door has a bottom channel, slide the new seal into place. For other types, attach the seal directly to the bottom edge of the door.
- Test the Seal: Close the garage door and check for any gaps. Adjust the weather stripping as necessary to ensure a tight seal.
How Often Should I Replace My Garage Door Weather Stripping
Weatherstripping on a garage door usually lasts about 2 to 5 years. How long it lasts depends on the material and how much sun, rain, or snow it gets. It’s smart to check it once a year for any damage.
If you see cracks, feel air coming in, or notice it’s coming loose, it’s time to replace it. Replacing worn weather stripping helps keep your garage warm, dry, and energy efficient. A quick check each year can help avoid bigger problems later.
FAQs on How to Install Garage Door Weather Stripping
Should you paint behind the garage door weather stripping?
Yes, it’s a good idea to paint behind garage door weather stripping before you install it. Painting the area first helps protect the wood from moisture and damage. Once it dries, you can add the weather stripping. This helps the garage stay sealed and keeps the paint job looking neat.
Should you see light through the garage door?
No, you should not see light through your garage door. If you do, it means there are gaps. That can let in wind, water, and bugs. You may need to adjust the door or replace the garage door weather stripping to keep the garage sealed and protected from outside elements.
How do I know when to replace weather stripping?
You should replace garage door weather stripping if you see cracks, feel air coming in, or notice water or bugs getting inside. If the strip looks worn or doesn’t bounce back when pressed, it’s time for a new one. Replacing it helps your garage stay dry, clean, and warm.
What is the weather stripping around a garage door called?
The weather stripping around a garage door is called a garage door seal or garage door weather stripping. It includes side seals, top seals, and bottom seals. These strips help block out rain, wind, and pests. They also help keep the garage warmer in winter and cooler during summer.
Conclusion
Sealing your garage door is one of the smartest ways to keep your space warm, clean, and protected. This guide on how to install garage door weather stripping in Sacramento walks you through each step so you can get it done quickly and easily with just a few tools.
Adding weather stripping helps block out cold air, moisture, and dust while improving energy efficiency. It also makes the garage feel more comfortable and keeps your belongings safer. This small update can make a big difference, especially during the changing seasons.
R&S Overhead Doors and Gates of Sacramento, CA, offers fast, reliable service to help you get it done right. Whether you want to handle it yourself or prefer our help, we’re just a call away. Contact our 24-hour emergency service at (916) 371-5320 for expert support anytime.
End Note
Learning how to install garage door weather stripping is a great way to keep your garage more comfortable and save on energy costs. R&S Overhead Doors and Gates helps homeowners with sealing, repairs, and complete installations. You can learn more from our company background.
We also work with businesses on all kinds of commercial garage doors, including durable sectional doors. Want to see what we’ve done? Our portfolio shows real projects. We cover a wide service area, and our locations page helps you find us near you.
We share more tips and updates on Bloglovin, Linkcentre, and this LinkedIn article. You can also find us on Find Us Here. Whether it’s a small upgrade or full install, we’re here to help.